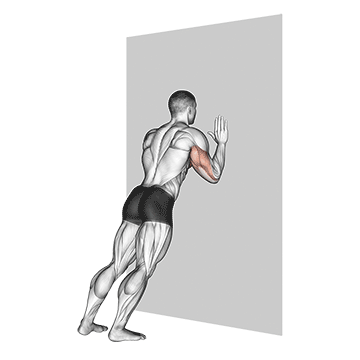
Push-up (wall)
beginner strength exercise · body weight · targets pectorals
- Body part
- chest
- Primary target
- pectorals
- Equipment
- body weight
- Difficulty
- beginner
The wall push-up is the most accessible variation of the push-up family — performed standing, with hands pressed flat against a wall, arms bent and extended to mimic the press. By keeping the body almost vertical, you remove the vast majority of body weight from the load. What's left is just enough resistance to teach the basic pressing pattern, build the connective tissue tolerance needed for harder variations, and condition the wrists, elbows, and shoulders for what comes next. It's not flashy, and many people skip it in a rush to do harder variations. That's a mistake. For people brand new to training, returning from injury, elderly trainees building back strength, or anyone significantly deconditioned, the wall push-up is where the journey starts. It's also a useful warm-up for stronger trainees: 1-2 sets of 15-20 wall push-ups before heavier pressing primes the joints without depleting the muscles. The goal isn't to stay here forever. Wall push-ups are a stepping stone — most people graduate within 2-4 weeks to incline push-ups on a kitchen counter or bench. But that 2-4 weeks of foundation work prevents the form breakdown and joint stress that comes from rushing into floor push-ups too early.
Why train the Push-up (wall)?
- Lowest entry barrier of any push-up variation — accessible to almost anyone regardless of fitness level.
- Conditions the wrists, elbows, and shoulders for higher-load variations to come.
- Allows beginners to practice push-up mechanics (alignment, breathing, elbow tracking) without strength being a barrier.
- Doubles as a warm-up for stronger trainees before heavier pressing work.
- Useful in rehabilitation contexts under medical supervision — low load, controlled range.
- Can be done literally anywhere a wall exists, with no setup or warm-up required.
How to do the Push-up (wall): step by step
- 1Stand facing a wall, about arm's length away.
- 2Place your hands on the wall at shoulder height, slightly wider than shoulder-width apart.
- 3Step back a few feet, keeping your body straight and your feet hip-width apart.
- 4Bend your elbows and lower your chest towards the wall, keeping your body in a straight line.
- 5Push back up to the starting position, straightening your arms.
- 6Repeat for the desired number of repetitions.
Muscles worked
Primary
pectorals
Secondary
triceps, deltoids
Common mistakes to avoid
Standing too close to the wall
If your feet are right under the wall, the exercise becomes trivial. Step back so that when your arms extend, you're at a slight forward lean. The further your feet are from the wall, the harder the exercise becomes — adjust distance to find the right level of challenge.
Breaking at the hips instead of the elbows
Some people lean their upper body in by hinging at the hips rather than bending the elbows. Keep the body in a straight line from heels to head — only the elbows bend. If you find yourself bending elsewhere, your distance from the wall is too far.
Letting the hands slide outward on the wall
Hands should stay where you placed them. If they shift out as you press in, the wall surface or your alignment is wrong. Position hands shoulder-width apart and keep them anchored throughout the set.
Skipping wall push-ups because they 'look easy'
Many beginners insist on starting with floor or knee push-ups, then practice bad form for weeks. Wall push-ups are humbling to do strict — give them a real attempt before assuming you've outgrown them.
Locking the elbows hard at the top
Aggressive lockout puts unnecessary stress on the joint. Press to full extension but stop just short of jamming the elbows — the muscles should be doing the holding, not the bones.
Easier and harder variations
Easier
Wall push-ups are typically the easiest variation. If even this feels too hard, try standing very close to the wall (almost touching it) so the press is minimal. As strength develops, step back to increase the load.
Harder
Move the feet further from the wall (greater forward lean). Once you can do 3 sets of 20 reps at significant lean, progress to incline push-ups on a kitchen counter or sturdy table.
Alternative exercises
Incline push-up
The next progression after wall push-ups. Hands on a bench, counter, or step instead of vertical wall. Same mechanics, more body weight on the arms.
Standing chest squeeze
Press the palms together at chest height with intent. Builds chest activation awareness before push-ups, useful for absolute beginners.
Wall plank
Hold the top position of a wall push-up for time (30-60 seconds). Builds endurance and shoulder positioning awareness.
How to program the Push-up (wall) into your training
Wall push-ups are typically used as a 2-4 week introduction phase, not a permanent exercise. During that introduction: 3 sessions per week, 3 sets of 10-20 reps with 60-90 seconds rest. Move on to incline push-ups when 3 sets of 20 feel easy. For true beginners or rehabilitation contexts: start with 2 sets of 8-10 reps, twice per week. Add reps and sets gradually. Patience here pays off — building tissue tolerance to pressing prevents the elbow and shoulder issues that often derail enthusiastic newcomers. As a warm-up for stronger trainees: 1-2 sets of 15-20 reps before heavier pressing work. The light load primes the joints and reinforces the pressing pattern without fatiguing the muscles. For seniors or significantly deconditioned trainees, wall push-ups can be a permanent staple — there's nothing wrong with using them as the main pressing exercise indefinitely if floor variations remain inappropriate. In that case, build to 3 sets of 25-30 reps for chest and shoulder maintenance. Do not pair multiple push-up variations in the same workout when you're at the wall stage — pick one and master it before adding complexity.
Recovery and frequency
Wall push-ups have minimal recovery cost given the light load. Daily training is fine for most people, even multiple times per day for grease-the-groove style work. The most likely soreness is in the chest and front delts during the first 1-2 weeks of training, especially if these muscles haven't been worked recently. That fades quickly. If the wrists feel achy, switch to a fist position or push-up handles. The shoulders should feel worked but not pinched — sharp pain at the front of the shoulder is a signal to back off and reassess form before continuing.
Frequently asked questions
How many sets and reps of wall push-ups should I do?
3 sets of 10-20 reps with 60-90 seconds rest, performed 2-3 times per week. Once 3 sets of 20 feel easy, progress to incline push-ups.
How often should I train the wall push-up?
2-3 times per week is typical, but daily is fine for low-volume practice. The light load means recovery isn't a major concern.
How long should I do wall push-ups before moving to harder variations?
Most people graduate within 2-4 weeks. Build to 3 sets of 20 clean reps with the feet at a meaningful distance from the wall, then move to incline push-ups on a counter or bench.
Are wall push-ups effective for building chest muscle?
For absolute beginners, yes — they create enough stimulus to drive early adaptations. For trained individuals, the load is too light for hypertrophy. Use them as a warm-up or introduction, not a long-term chest builder.
Are wall push-ups good for seniors?
Yes — they're often the most appropriate pressing exercise for older adults building or maintaining upper body strength safely. Low joint stress, easy to scale, and no floor work required.
Can I do wall push-ups during pregnancy?
Generally yes, though always confirm with your healthcare provider. Wall push-ups avoid the prone position that becomes uncomfortable later in pregnancy and load minimally on the abdominal wall.
Useful tools for this exercise
Build a workout with the Push-up (wall)
Puna gives you guided bodyweight workouts you can do anywhere — no equipment, no gym, just structured progressions that build real strength.