Incline Reverse Grip Push-up
intermediate strength exercise · body weight · targets pectorals
- Body part
- chest
- Primary target
- pectorals
- Equipment
- body weight
- Difficulty
- intermediate
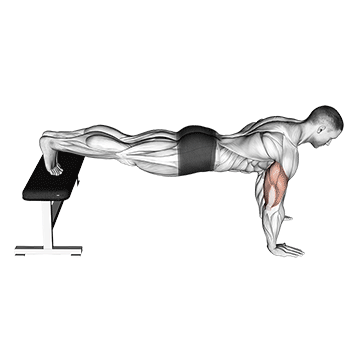
The incline reverse-grip push-up flips the standard hand orientation: instead of fingers pointing forward, the fingers point back toward your feet, with hands on an elevated surface. This unusual hand position shifts the loading pattern dramatically — the biceps engage more than in any standard push-up variation, and the lower chest takes more emphasis than the upper. It's a specialty exercise that fills a small but useful niche. Most pressing exercises emphasize the upper chest and minimize bicep involvement. The reverse-grip orientation does the opposite, making it a useful complement to standard pressing in a complete upper-body program. Trainees who add 1-2 weekly sets of reverse-grip push-ups often notice better lower-chest development and slightly more bicep volume than they'd get from pressing alone. The wrist demand is the catch. The reverse grip places the wrists in extension that many people find uncomfortable, especially during the descent. Build the position slowly with a higher surface and lower reps before attempting floor variations. Done within tolerance, the exercise rewards experimentation; pushed too hard too fast, it leads to wrist tendinopathy that can take weeks to resolve.
Why train the Incline Reverse Grip Push-up?
- Loads the lower chest more than standard push-ups due to the reverse-grip angle.
- Engages the biceps significantly more than any other push-up variation.
- Adds variety to chest training when standard pressing has become routine.
- Useful complement to standard pressing in well-rounded upper-body programs.
- Incline angle reduces overall load, making the variation accessible to most trained athletes.
- Can be performed on a bench, counter, or sturdy box — minimal equipment needed.
How to do the Incline Reverse Grip Push-up: step by step
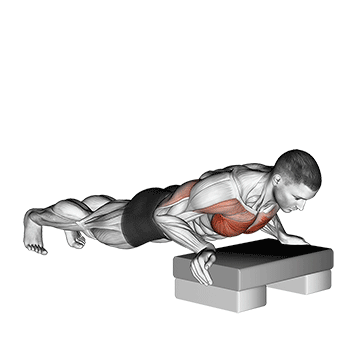
- 1Place your hands on the edge of a bench or elevated surface, slightly wider than shoulder-width apart.
- 2Extend your legs behind you, resting on the balls of your feet, creating a straight line from your head to your heels.
- 3Lower your chest towards the bench by bending your elbows, keeping them close to your sides.
- 4Pause for a moment at the bottom, then push yourself back up to the starting position by extending your arms.
- 5Repeat for the desired number of repetitions.
Muscles worked
Primary
pectorals
Secondary
triceps, shoulders
Common mistakes to avoid
Skipping wrist preparation
The reverse-grip position places the wrists in significant extension. Spend 60-90 seconds on wrist mobility before each session — this is non-negotiable for this variation.
Choosing a surface that's too low for your wrist tolerance
Beginners to the reverse-grip position should start with a high incline (counter or higher) where the wrist demand is minimal. Lower the surface progressively over weeks, not in a single session.
Performing high-rep sets in the first weeks
Wrist tissues need time to adapt to the reverse-grip position. Start with 6-8 reps per set; build to 12-15 reps over 4-6 weeks. Jumping to high volume from day one usually leads to wrist pain.
Letting the elbows flare during the descent
Wide elbows in the reverse-grip position load the front of the shoulder uncomfortably. Keep the elbows tucked closer to the ribs than in a standard push-up — usually narrower than 30 degrees from the torso.
Sagging hips under the unusual loading
The reverse-grip variation feels different from standard push-ups, and the unfamiliarity often leads to losing core engagement. Brace the abs and squeeze the glutes so the body stays a straight line throughout.
Easier and harder variations
Easier
Use a higher surface (wall or counter instead of bench). Reduce reps and increase rest. Or perform with hands at standard orientation first, transitioning to reverse-grip over weeks.
Harder
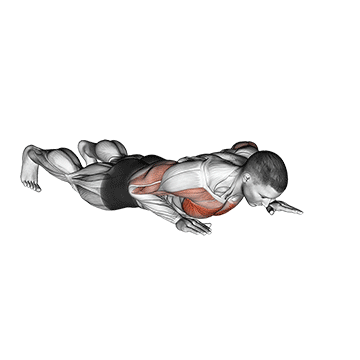
Lower the surface (bench to low step to floor). Add weight (a small plate on the back). Or progress to reverse-grip floor push-ups, which significantly increase the wrist demand.
Alternative exercises
Standard incline push-up
Same incline angle with conventional hand orientation. Better default for chest training, with the reverse-grip as a specialty variation.
Chin-up
Reverse-grip pulling exercise that engages the biceps similarly to reverse-grip push-ups. Useful pairing for arm-focused programming.
Suspension trainer push-up with grip rotation
Allows the wrists to rotate through the full range of motion, reducing the joint stress while still varying the grip orientation.
How to program the Incline Reverse Grip Push-up into your training
Reverse-grip incline push-ups work best as a secondary or accessory exercise, not the main pressing movement. The unusual loading pattern makes them more useful for variety than for primary strength building. Sets and reps: 2-3 sets of 8-12 reps with 60-90 seconds rest. Total weekly volume of 30-60 reps is the sweet spot — going beyond that often leads to wrist issues. In an upper body session: standard push-ups or pressing as the main work, reverse-grip incline push-ups as a 2-3 set accessory for chest variety and bicep involvement. Programmed once or twice per week. For athletes specifically chasing lower-chest development, run reverse-grip incline push-ups for a 4-6 week block alongside dips and standard pressing. The combination addresses the lower chest from multiple angles. Do not program reverse-grip push-ups in your first month of upper-body training, and don't program them more than twice per week even when adapted. The wrist demand needs respect.
Recovery and frequency
Wrist tightness is the main feedback after reverse-grip push-up sessions. Daily wrist mobility work and patience with progression help the tissues adapt. If wrist pain persists between sessions, switch to standard push-ups for a week or two before attempting reverse-grip again. The muscle groups (lower chest, biceps, anterior delts) recover within 48 hours of moderate work. Sleep, hydration, and standard recovery practices cover the rest.
Frequently asked questions
How many sets and reps of reverse-grip incline push-ups should I do?
2-3 sets of 8-12 reps with 60-90 seconds rest. Limit to 30-60 total weekly reps to protect the wrists.
How often should I train the reverse-grip incline push-up?
Once or twice per week. The unusual wrist position makes daily training a recipe for tendinopathy.
Why do my wrists hurt during reverse-grip push-ups?
The reverse-grip places the wrists in significant extension. Use a higher surface to start, build wrist tolerance with mobility work, and progress slowly. If pain persists, switch to push-up handles or skip this variation.
Are reverse-grip push-ups effective for lower chest development?
Yes — the angle shifts emphasis to the lower portion of the pectorals more than standard pressing. Combined with dips, they round out lower-chest training that standard push-ups don't fully address.
Reverse-grip push-ups vs standard push-ups: which is better?
Different tools. Standard push-ups should be the foundation; reverse-grip is a specialty variation for variety and lower-chest emphasis. Don't replace standard pressing with reverse-grip; add it as accessory.
Can I do reverse-grip push-ups with wrist issues?
Generally not — the position aggravates most wrist conditions. Stick to standard push-ups or use push-up handles to keep the wrists neutral until the underlying issue resolves.
Useful tools for this exercise
Build a workout with the Incline Reverse Grip Push-up
Puna gives you guided bodyweight workouts you can do anywhere — no equipment, no gym, just structured progressions that build real strength.