Suspended Row
intermediate strength exercise · body weight · targets upper back

- Body part
- back
- Primary target
- upper back
- Equipment
- body weight
- Difficulty
- intermediate
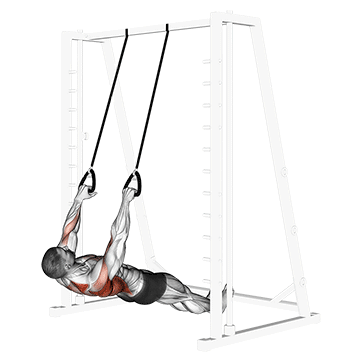
The suspended row is a horizontal pulling exercise performed on a suspension trainer like TRX or gymnastic rings, with a parallel grip orientation. The setup positions the body angled beneath the anchor point, and the trainee pulls the chest toward the handles by retracting the shoulder blades and bending the elbows. The unstable handle support adds shoulder stability and core demand to the standard horizontal row pattern. For home trainees with suspension trainer access, this is one of the most effective horizontal pulling exercises available. The combination of bodyweight load, parallel grip orientation (shoulder-friendly), and unstable handles produces well-rounded back development with minimal joint stress. The exercise scales easily through body angle adjustment — more horizontal is harder, more upright is easier — making it accessible to beginners and challenging to advanced trainees. Where this earns particular value is for trainees with anterior shoulder issues. Standard inverted rows with overhand grip can flare existing shoulder problems; the parallel grip of the suspended row reduces rotational stress significantly. Combined with the instability that engages the rotator cuff stabilizers, the exercise often becomes part of shoulder rehabilitation protocols. For general bodyweight back development, suspended rows pair naturally with pull-ups (vertical pulling) and push-ups (pressing) for complete upper-body training in any home environment.
Why train the Suspended Row?
- Combines horizontal pulling with shoulder stability training in one shoulder-friendly exercise.
- Builds the upper back, lats, and biceps through bodyweight horizontal loading.
- More shoulder-friendly than overhand inverted rows due to parallel grip orientation.
- Engages the rotator cuff and stabilizers more than fixed-bar variations.
- Scales easily through body angle adjustment for any fitness level.
- Useful as part of shoulder rehabilitation programs for anterior shoulder issues.
How to do the Suspended Row: step by step
- 1Set up a suspension trainer at an appropriate height.
- 2Stand facing the anchor point with your feet shoulder-width apart.
- 3Hold the handles with an overhand grip, palms facing each other.
- 4Lean back, keeping your body straight and your heels on the ground.
- 5Pull your chest towards the handles, squeezing your shoulder blades together.
- 6Pause for a moment at the top, then slowly lower yourself back to the starting position.
- 7Repeat for the desired number of repetitions.
Muscles worked
Primary
upper back
Secondary
biceps, shoulders
Common mistakes to avoid
Hips sagging during the pull
The body should travel as a single unit. Brace the abs and glutes throughout — sagging hips break the line and reduce training stimulus.
Pulling with the arms instead of the back
The unstable support amplifies any arm-dominance tendency. Initiate by retracting the shoulder blades, drive the chest toward the handles, let the arms follow.
Letting the handles drift apart
On suspension straps, the handles can drift outward. Keep them parallel throughout the rep to maintain proper loading.
Going too horizontal too soon
The instability makes a given body angle harder than fixed-bar work. Start more upright and progress over weeks as the stabilizers strengthen.
Not adjusting strap length properly
Strap length determines body angle. Adjust until 8-12 reps challenge you. Too easy reduces stimulus; too hard breaks form.
Easier and harder variations
Easier
Make the body more upright — stand more vertical relative to the straps. The more vertical, the less load through the back. Or use shorter straps for higher handle position.
Harder
Walk feet further forward to make the body more horizontal. Or elevate feet on a bench for inverted body angle. For maximum challenge, single-arm suspended rows with severe stability demand.
Alternative exercises
Inverted row (fixed bar)
Same horizontal pulling without instability. Easier on shoulders for trainees who need stable support.
Pull-up
Vertical pulling alternative. Pair with suspended rows for complete back development.
Bodyweight standing row (towel)
Accessible alternative when no suspension equipment is available.
How to program the Suspended Row into your training
Suspended rows work as primary horizontal pulling work in any bodyweight or hybrid program with suspension access. Sets and reps: 3-4 sets of 8-12 reps with 60-90 seconds rest. The instability typically reduces rep counts vs fixed-bar; adjust angle to keep reps challenging. Frequency: 2-3 times per week. The back and shoulders recover within 48 hours from this volume. In an upper-body session: pair with push-ups for balanced training. Sample order: 4 sets of 10 suspended rows, 4 sets of 8 push-ups, 3 sets of 6 pull-ups (separate bar), 3 sets of 30-second hollow holds. For shoulder rehabilitation: 3 sets of 8-10 reps, 3 times per week, paired with rotator cuff prehab. The shoulder-friendly position supports return-to-training during shoulder issues. For those building toward gymnastic skills: 4 sets of 8-10 reps, 3 times per week, alongside ring push-ups and tucked planche holds. For general fitness: 3 sets of 8-12 reps, 2 times per week, as part of balanced upper-body work. Don't program suspended rows on the same day as heavy overhead pressing — cumulative shoulder demand can exceed tolerance.
Recovery and frequency
Suspended rows recover within 24-48 hours from moderate volume. The instability training increases demand on small stabilizers, which can stay sore longer than primary movers in early sessions. Watch for anterior shoulder soreness, biceps tendinopathy, and wrist soreness from sustained gripping. Standard back and lat soreness fades within 48 hours.
Frequently asked questions
How many sets and reps?
3-4 sets of 8-12 reps with 60-90 seconds rest. Adjust body angle to keep reps challenging.
How often?
2-3 times per week. The back and shoulders recover within 48 hours.
Suspended row vs fixed bar inverted row: which is better?
Different goals. Fixed bar is more accessible and easier on shoulders. Suspended adds instability for shoulder stability training. For pure back work, fixed bar; for stability training, suspended.
Do I need expensive equipment?
No — basic suspension trainers cost $30-50 and last for years. Excellent value for home trainees.
Will this build my back?
Yes — same horizontal pulling pattern as fixed-bar inverted rows with added shoulder stability training.
Can I do this with shoulder issues?
Often yes, especially with the parallel grip orientation. The shoulder-friendly position makes this exercise often part of rehabilitation programs.
Useful tools for this exercise
Build a workout with the Suspended Row
Puna gives you guided bodyweight workouts you can do anywhere — no equipment, no gym, just structured progressions that build real strength.