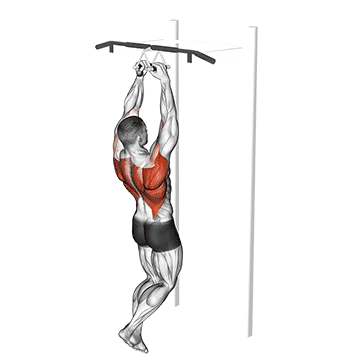
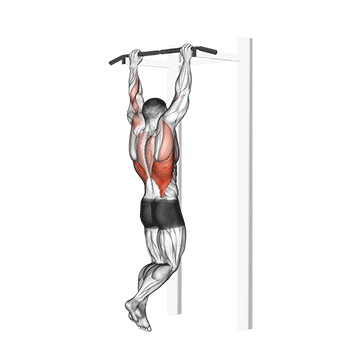
Inverted Row
beginner strength exercise · body weight · targets upper back
- Body part
- back
- Primary target
- upper back
- Equipment
- body weight
- Difficulty
- beginner
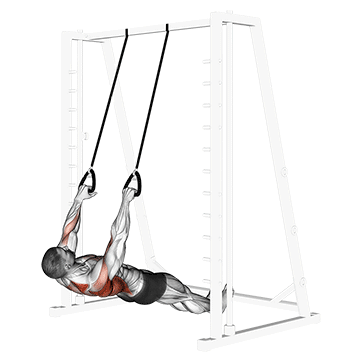
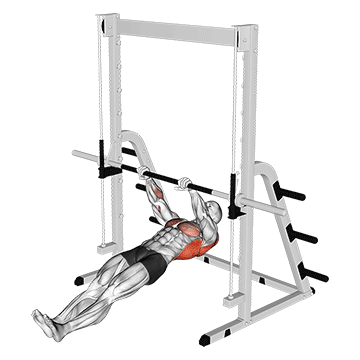
The inverted row is the bodyweight equivalent of a barbell row — and arguably the most underrated horizontal pulling exercise in all of strength training. Hanging beneath a fixed bar with the body angled and feet on the ground, you pull the chest up to the bar by retracting the shoulder blades and bending the elbows. The exercise builds the entire upper back, lats, and biceps through a horizontal pulling pattern that pull-ups don't fully cover. Most trainees overlook horizontal pulling in favor of vertical (pull-ups, lat pulldowns). This is a mistake. The horizontal pull pattern trains different fibers within the lats and the middle back muscles (rhomboids, mid-traps) that pull-ups under-engage. The combination of horizontal and vertical pulling produces complete back development; vertical alone leaves real gaps in mid-back strength and posture. For trainees serious about back development without a gym, the inverted row is non-negotiable. What makes the inverted row particularly valuable is its scalability. Body angle controls difficulty — more horizontal (parallel to floor) is harder, more upright (chest closer to vertical) is easier. This makes the exercise accessible to beginners (upright angle, easy) and challenging to advanced trainees (feet elevated and body inverted). For home trainees with a sturdy bar at appropriate height (kitchen counter, doorway pull-up bar set low, suspension trainer), the inverted row provides a complete horizontal pulling solution that works at any fitness level.
Why train the Inverted Row?
- Builds the upper back, lats, and biceps through horizontal pulling that pull-ups don't fully cover.
- Trains the rhomboids and middle traps directly, addressing the postural muscles weakened by desk work.
- Provides clear scalable difficulty through body angle adjustment — accessible to all fitness levels.
- Improves shoulder blade control through the deliberate retraction at the top of each rep.
- Pairs naturally with push-ups for balanced bodyweight upper-body training.
- Useful as preparation for pull-up training, building horizontal pulling strength as a base.
How to do the Inverted Row: step by step
- 1Set up a bar at waist height or use a suspension trainer.
- 2Stand facing the bar or suspension trainer, with your feet shoulder-width apart.
- 3Grab the bar or handles with an overhand grip, slightly wider than shoulder-width apart.
- 4Lean back, keeping your body straight and your heels on the ground.
- 5Pull your chest towards the bar or handles, squeezing your shoulder blades together.
- 6Pause for a moment at the top, then slowly lower yourself back to the starting position.
- 7Repeat for the desired number of repetitions.
Muscles worked
Primary
upper back
Secondary
biceps, forearms
Common mistakes to avoid
Hips sagging during reps
When pulling, the hips often drop toward the floor as core engagement fades. This breaks the body line and turns a clean horizontal pull into a partial movement. Brace the abs and glutes throughout — the body should travel as one unit, not in segments.
Pulling with the arms instead of the back
Beginners often initiate the pull with the biceps, which limits how much back the exercise actually trains. Initiate by retracting the shoulder blades — pulling the chest up toward the bar — and let the arms follow. The back drives, the arms transmit.
Cutting range
Going halfway down or stopping the upward pull before the chest reaches the bar reduces training stimulus significantly. Go all the way down with arms fully extended at the bottom, and pull all the way up until the chest touches the bar (or as close as possible).
Letting the head poke forward
When the body fatigues, the chin tends to lead the pull — head pokes forward to make the chest seem closer to the bar. This shifts loading patterns and stresses the cervical spine. Keep the head neutral and let the chest do the work.
Wrong body angle for current strength
If you can't do 8-10 strict reps at the chosen body angle, the exercise is too hard — make the body more upright (less horizontal). If you can do 20+ easily, the angle is too easy — make the body more horizontal or elevate the feet. The angle should produce challenging sets in the 8-15 rep range.
Easier and harder variations
Easier
Make the body more upright — stand at a steeper angle relative to the bar. The more vertical the body, the less load through the back. Or perform with knees bent and feet flat on floor, which reduces the body lever significantly.
Harder
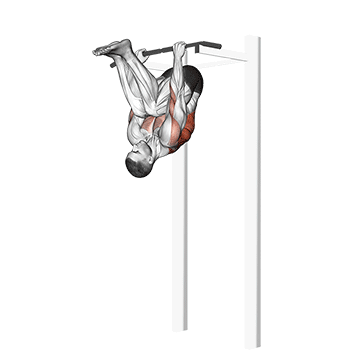
Make the body more horizontal — walk the feet further forward until the body is parallel to the floor. Or elevate the feet on a bench to create an inverted body angle. For maximum challenge, perform single-arm inverted rows by holding the bar with one hand only.
Alternative exercises
Pull-up
Vertical pulling that complements the horizontal training of inverted rows. Use both for complete back development.
Inverted row with straps (suspension trainer)
Same exercise on suspension straps. Adds instability that engages the core more and trains shoulder stability.
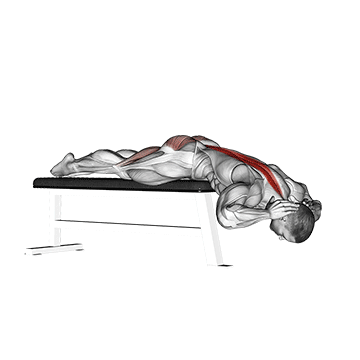
Bodyweight standing row (with towel)
Accessible alternative when no fixed bar is available. Use a towel looped around a sturdy door frame or pole.
How to program the Inverted Row into your training
Inverted rows work as primary horizontal pulling work in any bodyweight or hybrid program. They earn high frequency and significant volume. Sets and reps: 3-4 sets of 8-15 reps with 60-90 seconds rest. Adjust body angle to keep reps in this range. Total weekly volume of 50-100 reps is appropriate. Frequency: 2-3 times per week is the sweet spot. The back recovers within 48 hours from inverted row volume, supporting frequent training. In an upper-body session: pair with push-ups for balanced training. Sample order: 4 sets of 10 inverted rows, 4 sets of 10 push-ups, 3 sets of 6 pull-ups, 3 sets of 30-second hollow holds. Done 2-3 times per week. For those building toward pull-ups: inverted rows are the right horizontal preparation. 4 sets of 8-12 reps, 3 times per week, alongside dead hangs and negative pull-ups, builds the pulling strength that supports the first pull-up. For postural improvement: 4 sets of 12-15 reps, 3 times per week, paired with band pull-aparts and rear delt work. The combined approach addresses the rounded-shoulder posture most adults develop. For general fitness: 3 sets of 10-12 reps, 2 times per week, as part of balanced upper-body training. Sufficient for maintaining horizontal pulling strength and back muscular development. Don't skip inverted rows in favor of pull-ups alone. Vertical pulling without horizontal pulling produces incomplete back development.
Recovery and frequency
Inverted rows recover within 24-48 hours from moderate volume work. Higher volumes (5+ sets) need 48 hours. The exercise is generally well-tolerated and rarely produces overuse issues at reasonable volume. The main warning signs are biceps tendinopathy near the elbow (golfer's elbow signs), wrist soreness from sustained gripping, and shoulder discomfort during the pull. Biceps issues warrant reducing volume and adding eccentric forearm work. Wrist soreness benefits from daily wrist mobility. Shoulder issues during pulling often indicate improper scapular control — review the cue to lead with shoulder blade retraction. Standard upper back and lat soreness fades within 48 hours. No special recovery protocols needed beyond sleep, hydration, and reasonable nutrition.
Frequently asked questions
How many sets and reps of inverted rows should I do?
3-4 sets of 8-15 reps with 60-90 seconds rest. Adjust body angle to keep reps in this range. Total weekly volume of 50-100 reps is appropriate.
How often should I do inverted rows?
2-3 times per week. The back recovers within 48 hours from inverted row volume, supporting frequent training.
Inverted row vs pull-up: which is better?
Different exercises with complementary benefits. Pull-ups train vertical pulling (lats, upper back). Inverted rows train horizontal pulling (mid-back, rhomboids). For complete back development, both are essential. Don't choose one over the other; do both.
Will this build my back?
Yes, particularly the middle back, rhomboids, mid-traps, and rear delts. The inverted row is one of the most effective bodyweight exercises for these often-neglected muscles. Combined with pull-ups for lat development, it produces complete back training.
What if I don't have a bar?
Several alternatives work. A sturdy table or kitchen counter (with you underneath) provides the angle needed. A suspension trainer attached to a doorway works well. A towel looped around a closed door also works for the standing row variation.
How do I make this harder when 15 reps feel easy?
Three options. First, walk the feet further forward to make the body more horizontal — this increases the load through the back. Second, elevate the feet on a bench to invert the body angle. Third, progress to single-arm variations or weighted (vest) inverted rows.
Useful tools for this exercise
Build a workout with the Inverted Row
Puna gives you guided bodyweight workouts you can do anywhere — no equipment, no gym, just structured progressions that build real strength.